Friday, January 8, 2016

New piston with Keystone rings

Searching the net I came across a new 0.25 oversize piston set (336-11635-10) for the Yamaha LS3. Original NOS 1st oversize for a reasonable price. The set consists of the piston (52.25 mm), piston rings, piston pin and piston pin clips. The original piston was still "running" but the compression was at the lower end of the tolerance range.

Original Yamaha LS3 piston 336-11631-00-98

NOS first oversize piston set Yamaha LS3
NOS first oversize 52.25 mm piston set Yamaha LS3

A look inside the new original Yamaha piston

One big improvement of the new piston set is the so called "Keystone" piston ring set, which is better than the conventional one, because the keystone rings reduce blow-by and minimize the change of the ring sticking in it's groove.

Plain piston rings vs Keystone piston rings

You can recognize Keystone pistons by the "K" stamped on top of the piston head. Conventional/plain piston rings and Keystone rings are not interchangeable as the shape of Keystone rings is different and thus need a different shaped groove in the piston.

NOS piston with the letter K stamped on top - Yamaha LS3
NOS piston with the letter K stamped on top

 If you take a very close look (you almost need a magnifier) at the piston rings you will see the 25 stamp on top of each ring which indicates the first (0.25) oversize.

Oversize piston ring number (25) stamped on top of ring - Yamaha LS3 1972
Oversize piston ring number (25) stamped on top of ring

Close up of the "25" mark on the second piston ring - Yamaha two stroke
Close up of the "25" mark on the second piston ring

I brought the LS3 barrel with new piston to Milton Engines so they could give it a bore and hone after measuring the new piston.

bored and honed two stroke cylinder Yamaha LS3 1972
Bored and honed two stroke cylinder Yamaha LS3

As the piston came with NOS piston rings and no further instructions I had to find out which one of the rings was the top compression ring. Except for the "25" marks on top of both rings there were no other signs/marks on the rings. So I had to look for more differences; The ring with the green outside (also called parkerised ring) was a bit wider (measured width of the ring material) than the silver one. The grooves both had the same depth. When I took a closer look with a magnifier I discovered the silver ring was ribbed horizontally while the green one was smooth.

Close up of the second ribbed piston ring - Yamaha two stroke piston
Close up of the second "ribbed piston ring

The piston ring set came with a very thin expander ring. Normally this expander ring is put under the second ring.

Expander piston ring two stroke Yamaha LS3

The expander ring will give you a smoother ride because it makes the piston "rock" less in the bore. Most people don't use them, especially not in race bikes with bigger ports. If one of those expander rings brake and finds it's way out of the groove.... well you get the picture..

In order to find out which ring was the top piston ring, I measured the end gap for both rings in the freshly bored and honed barrel. The green one measured 0.30 and the silver one 0.25. Both within the specs of 0.15-0.35 mm. But I read on the net  most of the time the end gap of the 2nd ring is a bit bigger than the top piston ring end gap. If the second ring end gap is smaller than the top piston ring end gap you'll get gas build up between the top and second rings, This can cause the top ring to flutter or bounce and lose its seal. So the silver must be the top ring (See pics, first one is with the silver faced ring).

Piston ring en gap silver ring (0.25 mm) Yamaha 2 stroke
Piston ring en gap silver ring (0.25 mm)

Piston ring en gap green parkerised ring (0.30 mm) Yamaha two stroke
Piston ring en gap green parkerised ring (0.30 mm)

 I didn't use the expander ring either also because it was probably over 40 years old and a bit rusty.

NOS Yamaha piston 50.25 mm, needle bearing and wrist pin
NOS Yamaha piston, needle bearing and wrist pin wrong ring on top

Silver top compression ring - Yamaha LS3


Spark plug after the first mile
After the first mile test drive in a back street I took the bike for a spin across the city for an ID check in order to get a number plate. It's a ca. 24 km trip over mainly 60 km/h roads with traffic lights etc. Because the engine is still running in I tried to keep the revs a bit lower than I normally would.

The bike ran pretty well, no unusual sounds and no excessive smoking. In the pic below you can see the colour of the spark plug after the trip.


Spark plug after 30 miles on 60 km roads city traffic - spark plug reading two stroke
Spark plug after 30 miles on 60 km roads city traffic

After the ID check and 234,- dollars I finally got my number plate :)

New Mikuni VM20 carburettor

I had some problems with the original VM20 carburettor. After a while the carbie would overflow and whatever I tried it didn't solve the flooding problem. First I checked and replaced the valve and seat.. no difference. I also checked the float level more than a dozen times... still flooding.  So the float must have a small leak or is just somehow to heavy and won't rise enough to close the needle valve completely.

Original Mikuni VM20 carbie and float

New floats were hard to find and pretty expensive. After some research I decided to buy a brand new Mikuni VM20 Carburettor. With a price tag of 110,- AUD it's pretty cheap.

There are a couple of different VM20 carbs on the market and the one I bought, VM20-273, looks almost the same as the original.

The Mikuni VM20-273 is supplied with the following factory jetting installed:
Pilot jet 22.5 (M28/1001),
Needle 4J13, Needle Jet O-6/N-6 (238/332Series),
Main Jet 180 (4/042), Air Jet 0.5,
Slide Cutaway 2.0 (VM38/24),
Needle valve 1.5

Every engine requires it's own specific carb set up. Besides the engine you also have to take the climate and altitude in account.

The Yamaha LS3 VM20 carb has the following jetting installed:
Pilot jet 25
Needle 4J13 -2 Needle  jet O-0/N-6
Main jet 200 (120 for high land)
Slide cutaway 1.5
Needle valve 1.5

New original Mikuni VM20-273 carburettor - Yamaha LS3 1972
New original Mikuni VM20-273 carburettor

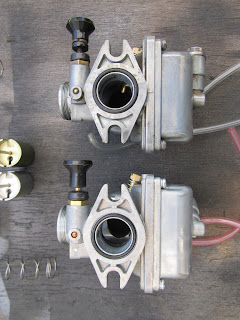
Old and new Mikune VM20 carbies - Yamaha LS3 1972
Old and new Mikuni VM20 carbie

Old and new Mikuni VM20 carburettor
Old and new Mikuni VM20 carburettor

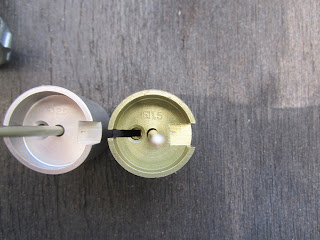
So the pilot jet, slide cutaway and the main jet are a bit smaller/leaner than original.

Old and new slide with different Cutaways - Mikuni VM20
Old and new slide with different Cutaways

Original Needle valve -  Mikuni VM20
Original Needle valve -  Mikuni VM20


Is it a problem?... Well, it depends on the weather and altitude. As I live on sea level altitude is not an issue. But.. the outside temperature can be very high in summer (30-40 0 Celsius) and that will effect the fuel/air ratio of the final mix.

The higher the outside temp the lower the amount of air/oxygen parts per cm3. So the higher the temp the richer the bike will run (less air for the same amount of fuel). Same story for the altitude, the higher you are the lower the amount of air molecules per cm3.


The current carbie set up is perfect for the hotter summer months. In winter I'll probably swap the pilot - and main jet for the original ones still sitting in the old carbie.

Tuesday, August 4, 2015

Ignition timing Yamaha two stroke

Now the painted engine is back in the frame I had to do some basic tuning before I could start the bike. First I had to charge the 6V battery. I used a power supply I bought for the DIY nickel plating jobs. The best voltage to charge a 6V battery is around 6.8V and the best current around 0.4A. If the battery is almost flat you'll see it draws a lower current, around 0.3A. After an hour or so it will go up to 0.4A.

Charging the 6V battery motorbike with a power supply
Charging the 6V battery
Clutch, bleeding the oil pump and carbie adjustments are pretty straight forward but setting the ignition timing on a bike like this was new for me because it's based on the flywheel magneto principle. The Yamaha LS3 has a so called low tension magneto, because the ignition coil isn't inside the flywheel but right under the fuel tank.

With this 1 cylinder 2 stroke bike the ignition points are hidden behind the flywheel magneto and this flywheel has to stay on the bike if you want to set your ignition timing. This because the cam that opens and closes the points is part of the flywheel magneto.

Ignition points - flywheel removed
Ignition points - flywheel magneto removed

If you have a set of brand new points it's, according to the manual, pretty simple; Just look for the max gap opening and make sure it's between 0.3 - 0.4 mm. That's it.

The points on this bike looked still pretty good so I decided to give them a second chance.
The manual says nothing about timing marks on the flywheel or other parts which I could use. Ah Well, maybe I'll find them while setting the ignition timing.

In order to set the ignition timing on two stroke bikes most manuals will give you a number BTDC (Before Top Dead Centre). For the Yamaha LS3 this is 1.8 mm BTDC. The spark plug has to fire at exactly that moment in order to give the best engine performance.

For this timing method you need a dial gauge which you can screw into the spark plug hole. You can buy them in a good bike shop but I already had made one myself from an old spark plug and some scrap metal which I used on the Yamaha RD125A

Dial gauge ignition timing tool two stroke Yamaha LS3
Dial gauge ignition timing tool

Dial gauge ignition timing tool two stroke Yamaha LS3

So the ignition points have to open at 1.8 mm BTDC. But how can you see when they open? First I tried it just by looking... not very accurate. You can also use a cigarette paper. Put it between the points and as soon as you can move it the points are starting to open.

Most old school bike shops use a buzzer to find the right spot. And in my pile of electronic waste I found an old  buzzer, the ones they use in cars to warn you when the lights are still on. Now you only need a 6V battery and some wire with crocodile clamps.

Connect the red wire to the pos (+) of the battery and the black to the black/black-white wire frome the iginition which goes to the ignition coil. Connect the Neg(-) of the battery to a ground/earth point on your bike. I used the chrome shift lever. Don't forget to turn the key of your bike. If it's switched off you won't hear any difference in tone while looking for the right spot.

Ignition timing tool two stroke engines - buzzer

Flywheel magneto ignition timing 2 stroke - Connecting the pos(+) wire to the black/blackwhite coil lead
Connecting the pos(+) wire to the black/blackwhite coil lead

Flywheel magneto ignition timing 2 stroke with a buzzer

Actually, before you connect the buzzer you have to look for the Top Dead Centre (TDC) of the piston with the dial gauge. From that point turn the flywheel clockwise till the piston has gone 3mm down, then turn it counter clockwise 1.2 mm, Now you're exactly 1.8 mm BTDC. The 3 mm turning clockwise is to rule out any play from the crankshaft.


So with the piston in this exact position the point have to open in order to generate a spark. Well  "exactly".. according to the manual it has to be between 2.0 mm and 1.3 mm BTDC.

Ignition - Timing specifications Yamaha LS3

As soon as you connect the buzzer it will start buzzing (of course.. it's a buzzer...) but the trick is to listen/look for a change in tone. At the moment the points open the tone of the buzzer will change. Probably not at the right spot, so you have to loosen the ignition mounting screw a bit and move the points a bit up or down till you find the right spot (between 2.0 and 1.3 mm BTDC)

Looking for the right ignition spot with a buzzer

I found the right spot but when I measured the max gap it was only between 0.25-0.30 mm. So I need a new set of points. The brown heel which makes contact with the flywheel cam was worn.

Settled for 1.65 mm BTDC - Ignition timing Yamaha LS3

With those old 6V two strokes the points hardly wear (there's only about 3.5V between the points), but the points heel will after a while and this will make the max point gap smaller, thus resulting in less advance timing.
After working on the points I sanded them carefully with 180 grit sandpaper and cleaned them with some wax and grease remover.

Ow... I also found a factory mark on the flywheel which was exactly in line with a mark mounted on the stator plate (see pic below). This can't be a coincidence ;)

Flywheel magneto ignition timing Yamaha LS3 1972

After adjusting the points I started the engine for the first time after reassembly. A big moment :)

Running 2 stroke engine Yamaha LS3 


Friday, July 31, 2015

Replacing the crank shaft oil seals

When a two stroke engine hasn't been used for years you can be almost 100% sure the crankshaft oil seals are dried out and will start leaking when you gonna run the engine. If your bike has only minor air leaks and you don't red line your bike too often you can get away with it for a while and maybe don't even notice there's an air leak.

The seal on the flywheel side prevents air from getting into the combustion chamber. If the seal on this side goes bad, you’ll get air leaks. If it's a big leak, your idle will hang and/or the bike will rev erratic randomly. The bike will run lean, it's impossible to tune it and there's a real danger of melting a hole in your piston(s). When you remove the cover on this side and you see oil at the bottom, you can be sure it's leaking.
The seal on the clutch side prevents crankcase oil from getting into the combustion chamber. If the seal on this side is leaking the engine will suck oil into the combustion chamber. You get greasy spark plugs, high oil consumption, lots of smoke, etc...not good...

Leaking crankshaft oil seals two stroke engine

As the engine was already out of the frame I started taking off the engine covers. Using an impact screwdriver will make the job a bit easier. Don't forget the long screw-bolt on the right (clutch) side which is hidden underneath the smaller oil pump cover. You can leave the oil pump inside the cover, just disconnect the tubes to the cylinder and oil tank.

Don't forget this bolt above the oil pump spindle

Clutch cover inside with oil pump gear Yamaha 100 LS3 1972
Clutch cover inside with oil pump gear

After taking off the engine covers I had to remove the flywheel/magneto and the clutch assembly. In order to loosen the clutch- and primary gear nut you need a special tool, a clutch holder, but even then it can be really hard. However there's a nice little trick to loosen those nuts in a couple of seconds. Take an air impact wrench, hold the clutch assembly firmly with your other hand (wear a glove, just in case..) and it will be loose in a second.

Clutch boss and gear and primary gear crankshaft Yamaha 1972
Clutch boss and gear and primary gear crankshaft

Primary gear crankshaft Yamaha LS3 100cc 1972
Primary gear crankshaft Yamaha LS3

Same story on the other side with the nut that's holding the flywheel nut. But once the nut is off  you really need a special tool, a flywheel puller. Now install the flywheel puller in the thread and use the air impact wrench again.

Yamaha Flywheel puller and Flywheel Yamaha LS3

When the flywheel magneto is off the engine you can loosen the two screws that hold the timing plate with a impact screwdriver. This way there's less change you'll damage the two screws.


Impact screwdriver set

Using the impact screwdriver to loosen some screws

Finally I could reach and remove the old crankshaft oil seals. If you don't have a special seal remover tool you can also use a screw to remove the seals. The "problem" with the screw method can be that you scratch/damage the surrounding metal in which case you've created a permanent leak which can't be solved with a new oil seal. The oil seal on the flywheel side can out pretty easy without any collateral damage.

First oil seal out
First oil seal out

However on the other side we have a different kind of oil seal; one with two lips. So it's a bit harder to put a screw in this seal. In my case it slipped a couple of times off of the seal and scratched the collar @#$^*!!
Luckily a new collar is only a couple of dollars so this issue was quickly resolved.

Old and new collar clutch side
Old and new collar crankshaft clutch side

Underneath the collar is another oil seal which you have to replace, it's a simple tiny O-ring. With a wooden pick I could lift it and pull it off the crankshaft. The new O-ring was of course a bit thicker then the worn out old one so it was a bit harder to put the collar back onto the crankshaft. But with the help of the old collar it was easy as..

Removing the old oil seal O-ring
Removing the old crankshaft oil seal O-ring

Fitting the new collar over the new O-ring Yamaha 2 stroke
Fitting the new collar over the new O-ring

Next time (on my Yamaha RD125A) I'm gonna use a special oil seal remover tool which I got in the mail today :)

Oil seal puller and installer set -Yamaha two stroke
Oil seal puller and installer set

When fitting the new oil seals you have to fill the lips with grease and  make sure they go in nice and even. I used a couple of pvc pipes to push 'm in. Make sure you're using a pipe with exactly the same outer diameter as the oil seal, otherwise you can easily damage the lips. Before I pushed them in I've put some oil on them to make things a bit easier.

Installing a new crankshaft oil seal- Yamaha 2 stroke
Installing a new crankshaft oil seal

With the new oil seals in place I had to put back the clutch assembly, primary gear and flywheel-magneto. This time no air wrench because those nuts need a specified torque: around 65 Nm for the primary gear and flywheel and around 55 Nm for the clutch assembly. But how do you stop those gears from turning. First I tried it with some rags between the primary gear and clutch gear, but the teeth were too sharp and the rags were simply eaten by the gears. Then I tried it with a 20 cent piece and it worked, however the coin is a bit damaged now ;)

Coin after use as "gear holder" Yamaha 2 stroke
Coin after use as "gear holder"

Oww...before I put the nuts back on used a bit of 243 Loctite threadlocker on the primary gear and flywheel nut.

Loctite 243 "Threadlocker"

Another thing I still needed was a clutch tool holder, but I couldn't find the right size on Internet so I made one myself. I used one of the metal clutch plates and attached a grinder spanner. It's a bit soft but it worked. Next time I will use 3-4 metal clutch plates together to make it a bit more solid.

Making a clutch holder tool - Yamaha two stroke
Making a clutch holder tool

DIY Yamaha Clutch holder tool
Home made Yamaha Clutch holder tool

Now I only have to buy me another clutch plate ;)